




Essential Load Backup Wiring: Panel & Switch Setup
An essential load battery backup system powers only selected circuits through a backup subpanel, transfer switch, inverter, and battery. For a 6kW / 10kWh build, the wiring plan should prioritize fridge, lights, router, outlets, and small motor loads while excluding high-demand appliances. The safest setup focuses on panel layout, transfer choice, neutral-bond reset, grounding, and inspection readiness.
Essential-load backup is about control. Instead of trying to run every appliance, you move the circuits that matter into a smaller backed-up panel and keep heavy loads off the battery. That makes the system easier to size, safer to operate, and more useful during real outages. The wiring plan starts with one question: what parts of the home must stay on when the grid goes down?
What Does an Essential Load Battery Backup System Actually Wire Together?
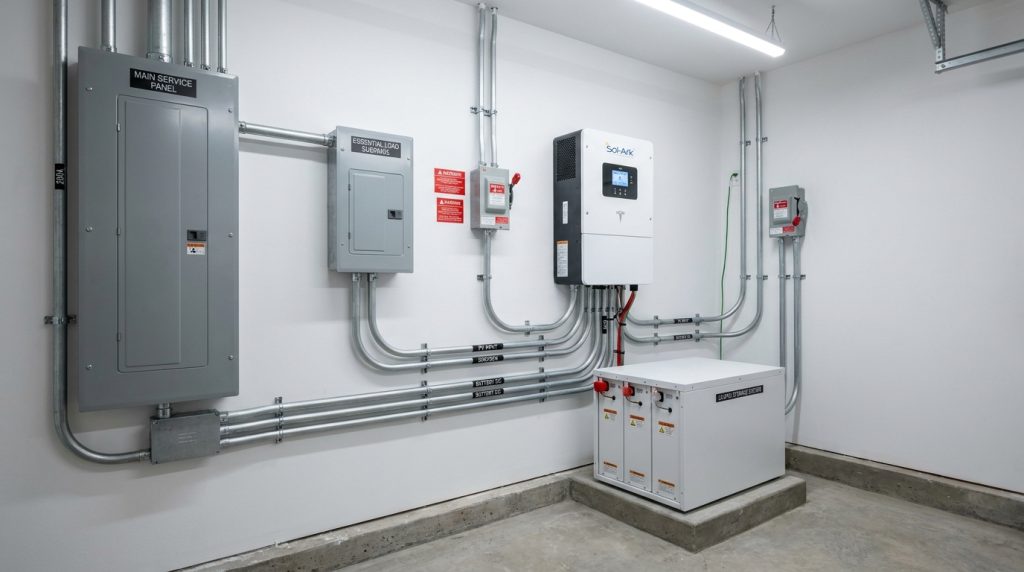
An essential load battery backup system wires selected circuits into a backup subpanel, then feeds that subpanel through approved transfer equipment and an inverter-battery system. The goal is to power priority loads while isolating the home from the utility during outages.
At the wiring level, this setup is a controlled path between the main service panel, a transfer device, the inverter, the battery, and the backed-up circuits. The main service panel still serves the home during normal grid operation. The backup subpanel serves only the circuits selected for outage power.
For broader storage basics, battery roles, and system architecture, review this home energy storage system guide. This article stays focused on the wiring-level decisions around panels, switching, neutral bonding, and grounding.
A simple essential-load backup layout usually includes:
- Main service panel
- Manual transfer switch, ATS, or backup gateway
- Essential-load panel or critical-load panel
- Hybrid inverter or battery inverter
- 10kWh LiFePO4 battery with BMS
- Disconnects, labels, grounding conductors, and inspection points
The U.S. Department of Energy explains that energy storage has both power capacity and energy capacity. That matters here because a 6kW inverter limits how much power can run at one time, while a 10kWh battery affects how long those loads can run.
Which Circuits Should Go Into the Essential-Load Panel?
Put only loads you truly need during an outage into the essential-load panel. Start with refrigeration, communication, lighting, safety equipment, and one or two comfort circuits, then exclude large heating, cooking, laundry, and EV loads unless the system is sized for them.
A good essential-load panel is selective. It should support safety, food protection, communication, and basic comfort. It should not become a second whole-home panel by accident. If too many large loads are moved into it, the inverter can overload and the battery can drain too quickly.
Use this table before moving circuits. It keeps the design practical for a 6kW / 10kWh backup build.
| Load or circuit | Backup priority | Surge concern | Recommended placement for 6kW setup | Field note |
|---|---|---|---|---|
| Refrigerator | High | Medium | Include | Leave surge margin for compressor start |
| Modem and router | High | Low | Include | Keeps communication online |
| LED lighting | High | Low | Include | Choose key rooms, not every light |
| Bedroom outlet circuit | Medium | Low | Include one circuit | Useful for phone charging and small devices |
| Furnace blower | Medium to high | Medium | Include only after checking specs | Gas furnace blower may fit, electric heat usually does not |
| Sump pump | High if flood risk | High | Include only after surge check | Test start-up current before relying on it |
| Well pump | Case-by-case | High | Usually needs review | May need larger inverter or soft start |
| Microwave | Low to medium | Medium | Usually exclude | Short use is possible only if load budget allows |
| Central A/C | Low for this build | High | Exclude | Needs larger inverter and controls |
| EV charger | Low | High | Exclude | Better handled by whole-home or load-managed design |
| Electric oven or dryer | Low | High | Exclude | High continuous draw shortens runtime fast |
This is where partial backup design becomes useful. The real decision is not whether the battery can power the whole house for a few minutes. It is whether the selected circuits can run for the outage length you expect.
How Does the Load-Shedding Panel Connect to the Main Panel and Inverter?
The backup subpanel is normally fed from the main panel, but during an outage the transfer equipment disconnects the utility path and allows the inverter to feed only selected circuits. This keeps high-demand loads off the battery and lowers overload risk.
The load-shedding panel, often called a critical-load panel, is the center of the design. Selected branch circuits move from the main panel into this smaller panel. The transfer equipment controls whether those circuits receive grid power or backup inverter power.
Solar-plus-battery systems do not automatically provide outage backup. Solar Victoria explains that backup power requires a system designed to isolate from the grid during an outage. That isolation is what prevents unsafe power flow back into utility lines.
Normal Grid Mode
In normal mode, the grid feeds the main panel. The essential-load panel also receives power through the approved wiring path. The battery may charge from solar or the grid, depending on system settings, utility rules, and inverter type.
This is also where existing solar owners need extra care. A home with rooftop PV may need an existing PV retrofit plan so the battery, inverter, and backup panel work together during outages.
Outage Backup Mode
In outage mode, the transfer switch, ATS, or backup gateway separates the backed-up circuits from the utility. The inverter then supplies the essential-load panel from the battery. OSHA warns that backup sources connected without a proper transfer switch can create backfeed risk for utility workers and others.
A safe article should not turn this into DIY live-panel instructions. The useful guidance is layout, design logic, labeling, and what a qualified installer must verify before energizing the system.
Manual Transfer Switch or ATS: Which Is Safer for This Setup?
Use ATS when backup must work while nobody is home or when pumps, refrigeration, or communication must stay online automatically. A manual transfer switch can fit budget-conscious, attended backup, but it depends on human action and must still isolate the utility.
A manual transfer switch is not always the wrong choice. It works when the homeowner is present, the load list is simple, and the goal is controlled backup during occasional outages. It can also reduce cost and complexity compared with a fully automatic setup.
An ATS is safer for unattended outages. If the home has a sump pump, medical-adjacent refrigeration, security equipment, or internet calling needs, automatic transfer is usually the better fit. Eaton describes an automatic transfer switch as equipment that monitors power sources and transfers loads between them.
| Choice | Best fit | Main advantage | Main limitation |
|---|---|---|---|
| Manual transfer switch | Attended backup | Lower cost and clear user control | Someone must switch it |
| Automatic transfer switch | Unattended backup | Restores selected loads automatically | Higher equipment and install complexity |
| Backup gateway | Integrated battery systems | Often manages grid isolation and backup logic | Must match inverter ecosystem |
| Interlock-style approach | Generator-style setups | Simple source selection in some systems | Needs correct listing, labeling, and local approval |
Schneider Electric describes transfer switches as devices that move loads between power sources and help prevent backfeeding. That backfeed prevention is the non-negotiable part, regardless of whether the switch is manual or automatic.
Where Should the Neutral Bond and Grounding Be Checked?
Neutral and grounding checks belong at the service disconnect, transfer equipment, inverter output, and backup subpanel. The main rule is simple: the system needs the correct neutral-ground bond location and a continuous equipment grounding path, without duplicate downstream bonds.
Neutral bonding is one of the easiest places to make a quiet but serious mistake. In many homes, neutral and ground are bonded at the service disconnect. Downstream subpanels usually keep neutral and ground separated. Adding service-rated transfer equipment or backup equipment can change where the bond belongs.
Grounding has a different job. The equipment grounding conductor gives fault current a safe path so protective devices can operate. It does not replace neutral, and it should not be used as a current-carrying conductor.
Neutral-Bond Reset After Service-Rated Transfer Equipment
A neutral-bond reset means the installer checks whether the service disconnect point changed after adding transfer equipment. If the transfer switch or gateway becomes service equipment, the bonding location may need review under local code and the Authority Having Jurisdiction.
The practical rule for the writer is clear: do not tell readers to move bonds themselves. Explain that duplicate neutral-ground bonds downstream can create objectionable current paths, nuisance trips, and inspection failure.
Grounding Checklist Before Inspection
Use this checklist as a design and review aid before energizing the system:
- Confirm the service disconnect location
- Confirm where neutral and ground are bonded
- Confirm neutral and ground are isolated in the backup subpanel when required
- Confirm equipment grounding conductor continuity
- Confirm grounding electrode system connection where required
- Confirm inverter grounding instructions match the system design
- Confirm all disconnects and panels are labeled
- Confirm AHJ and utility requirements before final approval
This is the section where expert judgment matters. A bigger battery does not fix a bonding error. If the neutral and grounding system is wrong, the backup system may look complete but still fail inspection or create unsafe fault behavior.
What Should the 6kW / 10kWh Wiring Diagram Callout Show?
A 6kW / 10kWh diagram should show the power path, the isolation point, the backed-up circuits, and the safety checkpoints. It should not show terminal-level instructions. The goal is to help the reader understand system layout before a licensed electrician finalizes the design.
The key design split is power versus energy. A 6kW inverter limits simultaneous load. A 10kWh battery limits runtime. If the backed-up loads average 1.2kW and usable capacity is about 8.5kWh, rough runtime is 8.5 ÷ 1.2, or about 7 hours before settings and real-world losses.
Diagram callout: 6kW / 10kWh essential-load backup layout
| Label | Component | What the diagram should show |
|---|---|---|
| A | Utility meter | Grid source feeding the home |
| B | Main service panel | Normal home distribution and non-backup loads |
| C | Transfer switch, ATS, or gateway | Utility isolation point for backed-up circuits |
| D | Essential-load panel | Only selected branch circuits |
| E | 6kW inverter | AC output feeding backed-up loads during outage |
| F | 10kWh LiFePO4 battery | Stored energy source with BMS |
| G | DC or battery disconnect | Service and emergency isolation point |
| H | Equipment grounding conductor | Continuous fault-current path |
| I | Neutral-bond check point | Location to verify bonding rules |
| J | Backed-up circuits | Fridge, router, lights, selected outlets, approved motor loads |
For wider runtime planning, use a backup sizing guide. The wiring diagram should support the load plan, not hide it.
What Should Be Checked Before the System Is Energized?
The system should be checked for circuit selection, transfer operation, utility isolation, neutral-ground setup, grounding continuity, labeling, and load behavior before it is energized. This step turns a clean drawing into a safe operating system.
Commissioning should include a realistic load test. For example, the installer can test the fridge, router, lights, and furnace blower together, then confirm the inverter does not trip when a motor starts. If a sump pump is included, surge behavior needs direct review.
Pre-energizing checklist
- Confirm every backed-up breaker is labeled
- Confirm non-essential loads are not in the backup panel
- Confirm transfer equipment changes source correctly
- Confirm utility backfeed protection
- Confirm neutral and ground are correct for the equipment layout
- Confirm grounding continuity
- Confirm inverter output settings
- Confirm battery BMS communication
- Confirm emergency disconnect labeling
- Confirm load test under normal expected outage use
- Confirm permit, utility, and inspection requirements
This is also where manual transfer habits matter. If the homeowner chose a manual switch, the operating steps should be posted near the equipment. A simple attended setup still needs clear labels and safe switching behavior.
When Should You Move From Essential-Load Backup to a Larger Design?
Move beyond essential-load backup when the home needs HVAC, EV charging, electric cooking, a large well pump, or long runtime without load cuts. In that case, adding more battery capacity may not be enough if the inverter cannot handle the simultaneous load.
Essential-load backup is often the more disciplined design for a modest battery. Whole-home backup feels easier from the homeowner’s side, but it can drain faster and cost more if loads are not managed. For many homes, selected circuits provide better outage value.
| If the problem is | What to change | Why it helps |
|---|---|---|
| Battery drains too fast | Add battery capacity or reduce loads | Runtime depends on usable kWh |
| Inverter trips | Reduce simultaneous loads or increase inverter size | Power draw exceeds output rating |
| Motor loads fail to start | Check surge rating or add soft-start support | Start-up current may be too high |
| Homeowner wants HVAC | Move to larger backup design | HVAC needs more power and controls |
| Existing solar must run in outage | Review inverter and backup architecture | Solar needs safe grid isolation |
If the homeowner wants a broader system, hand them to the whole-home comparison instead of stretching this article into a full storage design guide.
What to Do Next
A well-planned essential load battery backup system starts with the circuit list, not the battery catalog. Choose the loads first, then match the inverter, battery, transfer equipment, neutral bonding, and grounding plan to that load list.
For a 6kW / 10kWh build, stay disciplined. Keep the backup panel focused on refrigeration, communication, lighting, and a few safety or comfort loads. Then ask a qualified electrician to verify the transfer method, neutral-ground setup, grounding path, labels, permits, and inspection requirements before the system is energized.
Frequently Asked Questions
How big of a battery backup do I need for my home?
Size the battery by essential load and runtime, not by house size. A 10kWh battery can support a small essential-load panel for several hours, but runtime drops quickly if pumps, heating, or kitchen loads run often.
What is a critical load panel?
A critical load panel is a smaller subpanel that contains only the circuits intended to run during an outage. It usually includes refrigeration, internet, lighting, selected outlets, and safety loads instead of the full home.
How do you build a home battery backup system?
A home battery backup system is built from a battery, inverter, transfer device, disconnects, monitoring, and a backed-up load panel. The wiring design must be completed by a qualified installer because utility isolation, bonding, grounding, and permits affect safety.
Manual transfer switch or ATS for battery backup?
Choose ATS if the system must operate automatically during outages. A manual transfer switch can work for attended backup, but the user must be present, and the switch still must prevent utility backfeed.
Can a home battery backup power my entire house?
It can power the entire house only if the inverter, battery capacity, surge rating, and load management are designed for that demand. Many homes use essential-load backup because it costs less and extends runtime.
How long can a home battery backup power my home?
Runtime depends on usable battery capacity divided by average load. For example, 8.5kWh usable energy running 1.2kW of essential loads gives roughly 7 hours before reserve settings and real-world losses.
Can I run the A/C and fridge on a solar battery backup during a blackout?
A fridge is usually realistic, but central A/C needs much more inverter power and surge capacity. Do not place A/C on a 6kW essential-load build unless the equipment specs and load controls prove it can start and run safely.

-

 Stackable Home Battery System BMS Architecture Explained
2026-09-28
-
 Wall Mounted Lithium Battery System Safety and BMS Design
2026-09-25
-
 51.2V Server Rack Battery Wholesale: Cell Matching for Parallel Systems
 -
 China Lithium Battery Factory for Home Storage: Custom Capacity, Voltage & Enclosure
2026-09-24
-
 Home Energy Storage System Manufacturer for Modular Battery Expansion
Share this:





.svg)






-899.svg)


